Disclaimer: I am describing the process by which I replaced my OEM stereo head unit with an Android head unit in its place. I do not imply that this process will work for you. You are responsible for your actions and any damage that may happen to your car, its radio, or its systems is entirely your responsibility and not mine. I do not represent nor should it be construed that I endorse any of the merchants, vendors, or companies whose products are referenced within these instructions. I am giving the links to various entities because they are where I found the items I needed to complete this project. You are free to go to any supplier/vendor of your choosing. I recommend that you have a professional installer do the work unless you have sufficient knowledge to do your installation.
I did this installation myself on my 2004 Mercedes S430 4matic. My car is equipped with the Bose amplifier system that utilizes the MOST fiber optic system. Your car may or may not be similarly equipped. These instructions are what I did to make the transition to an Android head unit in my car.
This installation process will take anywhere from 4 to 6 hours for your average W220 owner to accomplish. This is assuming that your W220 has not had its wiring or anything else done to it that will impede the installation of the radio. That also means that the car is also free from having a lot of stuff stored in the cabin and trunk areas.
I strongly recommend you read through this guide before starting the process. I give reasons for why I do things a specific way or why I installed extra wires while doing the installation. Reading through all of this doesn’t take long and may save you some headaches later during your install.
One caveat: I have not been able to figure out how to power up the amplified antenna. As a result, my radio reception is not as good as the OEM factory system. If anyone knows where I can find the wire (and its description), please let me know. It’s really the last step I need to complete everything at this time. Every time I make an adjustment or add to this setup, I will be editing and posting these instructions.
Please note that I intend to post more pictures in the future as I have the time to take and edit them. Making this guide was an afterthought after I completed the install and enough people asked me how I did it. My bad.
I also recommend that you make sure what kind of system you have before ordering anything. It may be worth your time and effort to at least remove the OEM head unit and the trunk side trim to make sure everything is as expected (just follow the instructions below). The last thing you want to do is order a bunch of stuff and while doing the installation, discovering you don’t have what you need or you bought things you don’t need. Spend 15 minutes or so before ordering your Android head unit and other parts and take a quick look around in your car.

My car came with:
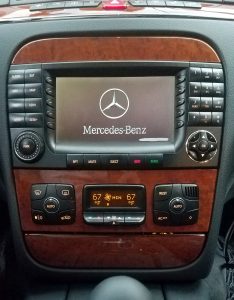
COMAND by Mercedes-Benz/Siemens VDO using the MOST fiber optic system, part # A220 827 4242 ZGS 000. The car’s stereo system is also equipped with the BOSE amplifier and speaker system (option 810). There are a total of 3 wires plus 2 fiber optic lines going into the head unit.

I replaced it with this:
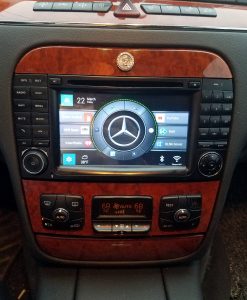
Rockchip PX5, my particular version is sold by Seicane and is their S127509 unit. There are multiple vendors of this particular style of an Android head unit aka AHU, just use a search engine of your choice to look for what you want in particular. The procedure I’m detailing is general enough that you don’t have to buy the same model AHU I did. An extended length radio antenna wire was included with the purchase by the vendor.
The default launcher works well, but choosing a different launcher that works well for your needs or esthetic desires may be an option you’ll want to exercise. I installed a different home screen launcher called CarWebGuru on my AHU. I found it to handle all my needs while also giving me a lot of flexibility in its appearance.
In addition to the AHU, you will need the following items for a clean installation:
- Optical fiber adapter for MOST optical systems: Amazon
- Fakra C to SMA Adapter for the GPS connection: Amazon
- Fakra C universal extension cable (6m): Amazon
- If your AHU vendor did not provide a radio antenna cable, you will need a 2nd Fakra C extension (previous line) and a Fakra Z Male to Motorola DIN Plug Connector Cable to connect the Fakra cable to the AHU: Amazon
Optional items:
- An extra 6m Fakra C universal extension cable (for future use just in case): Amazon
- Right angle GPS connection adapter: Amazon
- ELM 327 adapter: Amazon
- Rearview camera extension cable (6m) in case you do not already have one and plan to add a rearview backup camera in the future: Amazon
Tools needed:
- Multi-meter (it can be a cheap unit, it’s just to verify power leads)
- Torx screwdriver set
- Metric socket set
- Panel & trim prying tools
- Wire strippers
- Phillips #2 screwdriver
- Barrier terminal blocks (example) or T Tap electrical connectors (example)
- Soldering iron & electrical solder
- Dental pick or very fine icepick tool
- Fish tape for pulling wires (or a sacrificial heavy-gauge coat hanger)
- Good quality electrical tape (better yet, rubber electrical tape)
- A good quantity of small zip ties
- Dielectric grease
Although I have not used the following items myself, I have been told that it will be of interest to those who have a different setup than what I have in my car. A shoutout to my Facebook friend Tariq Shawan who uses these components on his car (which is equipped with the D2B fiber optic system) for the following information:
- Optical fiber adapter for D2B optical systems. I have been told that this particular fiber-optic adapter will work with Mercedes cars that are equipped with the D2B fiber optic systems. I strongly recommend confirming it with the vendor since it is labeled as a MOST adapter and not as a D2B adapter: AliExpress
- Carlinkit USB CarPlay Dongle (a hard connection between phone and AHU): AliExpress
- Carlinkit Wireless Smart Link Dongle (a wireless connection between phone and dongle, the dongle is hard connected to the AHU): AliExpress
If you are fitting an AHU to an earlier model COMAND head unit, you may also need to source the appropriate OEM wood trim pieces. Usually, the AHU’s vendor will supply plastic trim pieces that work but don’t quite feel or look as though they came with the car. I suggest eBay or other suppliers such as automobile breaking yards that can supply genuine OEM trim pieces. A quick search using your favorite search engine will bring a great number of sites to find these parts at reasonable prices.
I chose to strip back some of the insulation and use terminal blocks to make my connections to the car’s wiring. Alternatively, by using T Tap connectors, you can easily ‘tap’ into the wiring in place of stripping back the insulation as I did. The way I did it allowed for the easy application of dielectric grease to prevent oxidation or corrosion in the connections. The choice is yours, both methods work. I didn’t have any T Tap connectors on hand when I started doing the installation.
Before starting the conversion of the radio from the OEM head unit (COMAND) to the AHU, I cleared/removed all of my media from the car’s radio system. That includes any cassette or compact disc from the OEM head unit and the navigation disc and the compact discs from the trunk units. If nothing else, remove the disc & cassette from the OEM head unit. Once the OEM head unit is removed, there is no easy way to remove the media from the OEM head unit.

14 Responses to Android Head Unit Installation